Easter Eggs
Easter eggs when we were kids were done with kits. Every year we would go pick one out.
We would do color pellets and vinegar, the plastic shrink wrap’s with pictures on them that you would put in hot water.
Write messages on them with crayons.
Now we enjoy coming up with many different ways of doing Easter eggs.
Tie Dye Easter eggs.
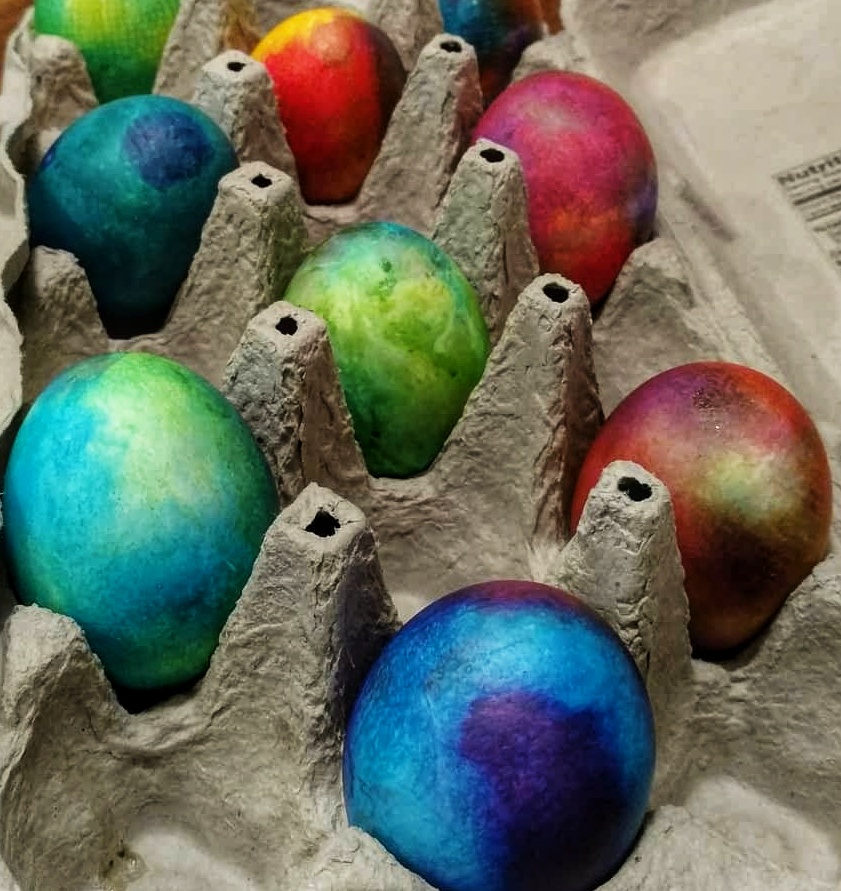
Tie Dye Easter Eggs
Equipment
- 1 Roll Paper towels
- 2-4 Paper plates
- Rubber gloves
- Table covering Plastic tablecloth, Newspaper, Trash bags
- 1 Egg carton
- 2 Plastic cups or more if needed
Materials
- 1 Dozen Hard boiled eggs
- Food Coloring
- 1 Cup vinegar 1 cup for every two cups used.
Instructions
- Make sure your hard-boiled eggs are cooled. We usually like to make our hard-boiled eggs the day before and let them cool in the fridge overnight.1 Dozen Hard boiled eggs
- Cover your table with a plastic tablecloth, newspaper or trash bags
- Fill two (or more if needed) plastic cups with ½ cup of vinegar1 Cup vinegar
- Lay out rubber gloves, paper plates and paper towels on the table
- Once you have put on the rubber gloves, take a paper towel and dip it in the vinegar, ring out excess vinegar back into the cup. Making sure that your paper towel is completely saturated.
- Holding the paper towel in one hand or placing it on the paper plate, put one egg in the towel and wrap it up.
- Still holding the egg or keeping it on the paper plate. Place 4-5 small drops of food coloring on the paper towel in random spots. Less is more in this case you do not want to cover the paper towel with food coloring. If you are using more than 3 colors do less 3-4 small drops.Food Coloring
- Once you have the colors on the paper towel, start rubbing the paper towel egg gently in your hands to combine the colors and create the tie dye effect.
- You only need to rub the egg a few times to spread the colors around. Make sure to open your towel and check on your egg after a few rounds to see if you have the design you are pleased with.
- Just keep in mind the more you rub the egg with the paper towel the more colors will spread, you want a tie dye effect, so if you keep rubbing you might end up with a solid color rather than a tie dye.
- Once you have reached the desired pattern/design. Place the egg back in the egg carton to dry.
- Throw away paper towel, and repeat the process until all the eggs are tie dyed.
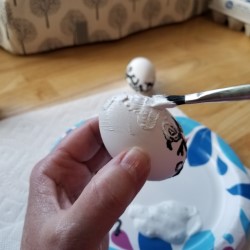
Vintage Easter Eggs
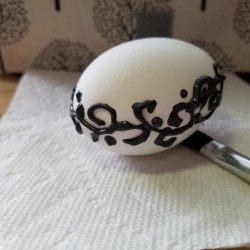
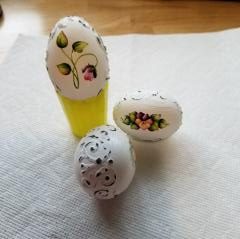
Vintage Easter Eggs
Equipment
- Fine grit sandpaper
- 1 Small flat paint brush
- 1 Soft cloth/rag
Materials
- 2 Washed, emptied, and dried eggs. Can always do more than 2 eggs.
- Stimulated liquid leading or Black fabric puff paint
- White acrylic craft paint
- Decals of choice
Instructions
- Blow out and rinse eggs. Let dry overnight.2 Washed, emptied, and dried eggs.
- Using Simulated Liquid Leading or Fabric Puff Paint, draw a decorative band around the egg, making sure to cover the holes on both ends. You can lightly trace a pattern with a pencil or free hand. Let dry overnight.Stimulated liquid leading
- Using the small flat paint brush, coat the entire egg in a layer of white acrylic craft paint. Let dry for 1hr.White acrylic craft paint
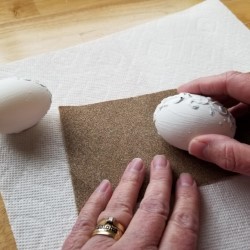
- With sandpaper laying on table, LIGHTLY sand only the decorative border to expose some areas and give it that antique look.
- Dust and rub egg with a soft cloth/rag.
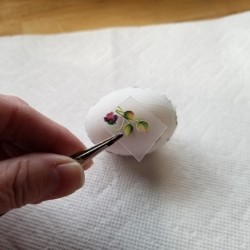
- Center and place on your desired decal, or hand paint a picture of your liking.Decals of choice
This post contains affiliate links. As an Amazon Associate we earn from qualifying purchases at no additional cost to you. Find our full disclosure here.
We can’t thank you enough for your support in making our dreams come true and allowing us to share our adventures, recipes, and stories with you all!
Donations are a great way to support us for some server time so we can continue to provide you with content.
About The Author
Spirits Food and Booze
Spirits Food and Booze was created with love, and ideas from each one of us. We love to share our ideas, crafts, recipes, fun times, and experiences. We are amateur ghost hunters, foodies, crafters, and all around enjoy having a good time. We hope you enjoy our site and come back for more!
